
Backlog คืออะไร ? คำควรรู้ก่อนเข้าสู่วงการอสังหาฯ
Backlog คืออะไร ? ทำความรู้จักคำศัพท์อสังหาริมทรัพย์ที่นักลงทุนควรรู้ เข้าใจความหมายของ Backlog และความสำคัญก่อนตัดสินใจซื้อบ้านหรือคอนโด
โพสต์เมื่อ27 January 2026
Automated Listing Refresh is a feature that helps you automatically move your listings back to the top position by scheduling specific dates and times in advance. This saves you time from manually refreshing each listing, especially when you have a large number of them.
In this article, we’ll clearly explain how to use the Automated Listing Refresh feature and guide you through the simplest steps possible. Let’s get started!
For who prefer to use Automated Listing Refresh, you should have these 2 package first.
If you don’t have the two packages mentioned above yet, you might not be able to use this feature. If you’re interested, you can check out some basic information in this article first. Or, if you’d like to give it a try, you can start with the smallest Top Up package , starting from just 500 THB.
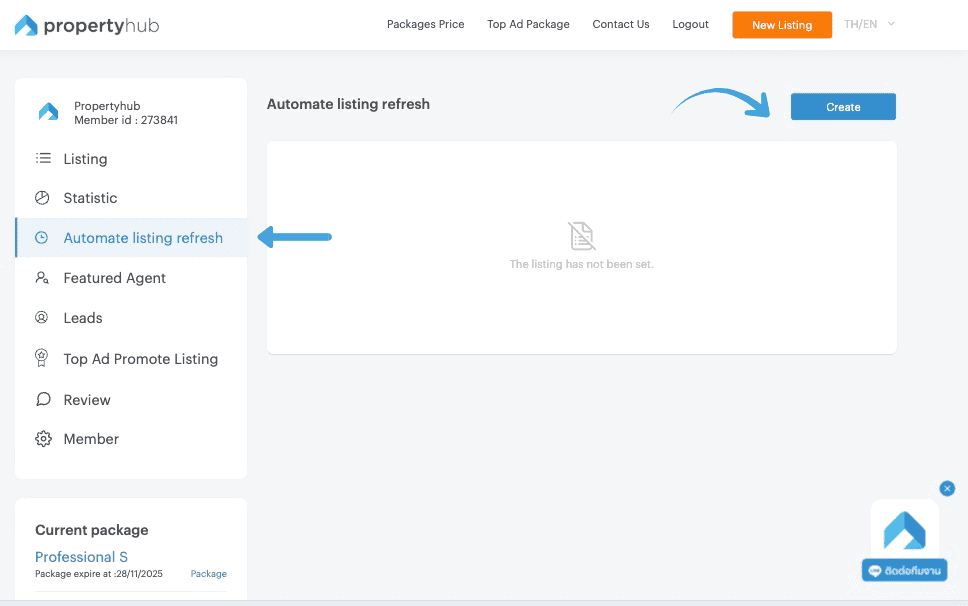
3. After clicking the “Create” button, a campaign scheduling window will appear in the center of your screen. You can begin by naming your campaign as desired.
4. Next, select the listings to include in the scheduled. At this stage, you can choose between two options :

5. If you select “Listings with Condition” in this part is allow you to choose a condition that you desire to manage it by selecting in 3 conditions
6. Add the conditions for the listings you want to include. After selecting the condition type, you can proceed to define them. There are three ways to add conditions as follows:
For Instance :
Assume I select in “Match All” Condition , so the system will select a listings with include in my adding from Tags Condition (Phayathai and XT Phayathai). Therefore, the listings that include in both Phayathai and XT Phayathai tags will be automatically refreshed.

7. This step is quite simple — you can choose whether to schedule by specific dates in the month or by days of the week. You can also select multiple days and multiple time as shown below.
Selecting specific dates in the month :
In this example, you schedule boosts on the 2th, 7th, and 10th of the month. For each of those dates, you set three time slots: 8:00 AM, 10:00 AM, and 1:00 PM. This means your listings will be automatically refreshed 3 days per month, with 3 times per day.

Selecting specific days of the week :
In this example, you select Tuesday and Friday by set three time slots: 8:00 AM, 10:00 AM, and 1:00 PM. This means your listings will be automatically refreshed 2 days per weeks, with 3 times per day.
![Step 7 for automated Listings Refresh [2]](https://bcdn.propertyhub.in.th/blog/Step-7-for-automated-Listings-Refresh-2.jpg)
8. Check your accurate details before Click “ Done” Button

PS. If you need to manage the campaign after it has started running, go to the “Action” column.
You’ll see two buttons — the left button is for On/Pause, while the right button shows a three-dot menu that includes the following options: Refreshed History, Edit campaign and Remove.

All of this guide how to use an Automated Listings Refresh on propertyhub.in.th. We hope this article will help you more clearly understand stage to use this function for managing your listings. However, if you have any question you can directly contact our team via Line : @propertyhub or Tel : 02-026-3049


Backlog คืออะไร ? ทำความรู้จักคำศัพท์อสังหาริมทรัพย์ที่นักลงทุนควรรู้ เข้าใจความหมายของ Backlog และความสำคัญก่อนตัดสินใจซื้อบ้านหรือคอนโด
โพสต์เมื่อ27 January 2026
Freehold vs Leasehold คืออะไร ? ทำความเข้าใจความแตกต่างของการถือครองอสังหาริมทรัพย์ เหมาะกับนักลงทุนมือใหม่ วิเคราะห์ข้อดี–ข้อควรรู้ของ Freehold และ Leasehold ก่อนตัดสินใจลงทุน
โพสต์เมื่อ21 January 2026
สรุปข้อมูลสถิติการใช้งานเว็บไซต์ propertyhub ในช่วง ไตรมาสที่ 4 (ตุลาคม – ธันวาคม 2568) เพื่อให้เกิดประโยชน์ต่อกลุ่มผู้ใช้งานในวงการอสังหาริมทรัพย์ประเภทคอนโด โดยครอบคลุมทั้งกลุ่มผู้ที่กำลังมองหา คอนโดเพื่อเช่าหรือซื้อ รวมถึงนายหน้าที่ต้องการวิเคราะห์พฤติกรรมผู้ใช้งานและแนวโน้มความสนใจในตลาดอสังหาริมทรัพย์
โพสต์เมื่อ09 January 2026
Web users insight on propertyhub.in.th in Quarter 4, 2025 (October - December). This article aims for anyone in the condo market which include buyer, renter, investor, or agent who wants to better understand current user trends and interests in property market.
โพสต์เมื่อ09 January 2026
ในการซื้ออสังหาริมทรัพย์อย่างคอนโดนั้น นอกเหนือจากราคาขายคอนโดแล้ว สิ่งที่ต้องทราบนอกเหนือจากนี้ก็คือเรื่องของ ขั้นตอนต่างๆ ที่ผู้ซื้อทุกรายจะต้องทำความเข้าใจ เพราะไม่ว่าจะเป็นการ ซื้อคอนโด มือหนึ่งจากผู้พัฒนาโครงการ หรือการซื้อคอนโดมือสองต่อจากผู้เป็นเจ้าของก็ตาม ขั้นตอนของการ โอนคอนโด คือเรื่องที่จะสร้างความปวดหัวไม่น้อยสำหรับใครที่ไม่เคยทำความเข้าใจมาก่อน
โพสต์เมื่อ29 August 2025
ทางทีมงาน Propertyhub จะขอพาคุณไปรู้จักกับวิธีเช็คแนวเวนคืนที่ดิน(เบื้องต้น)ก่อนตัดสินใจซื้ออสังหาฯ ทั้งนี้ก็เพื่อป้องกันปัญหาการเวนคืนที่ดิน ที่ขอบอกได้เลยว่าไม่มีใครอยากจะเจอ
โพสต์เมื่อ08 September 2023
เช็กราคาประเมินที่ดินล่าสุดปี 2568 ครบทั้ง 77 จังหวัด ใช้ประกอบการซื้อขาย หรือวางแผนลงทุนอสังหาได้แม่นยำยิ่งขึ้น
โพสต์เมื่อ10 February 2025